Wednesday, January 15, 2014

A Look Back at 2013

I'm embarrassingly late posting my 2013 review, but here goes! Last year seemed fairly uneventful compared to 2012, but there were definitely some great creative opportunities. This post includes a few photos that haven't appeared before on my blog. You may also click on any month to see to see all the posts for that month.

JANUARY was a bit slow, probably due to Blogger giving me fits, but I did exchange fun gifts with Laurie

FEBRUARY included quite a few great classes, including this darling Valentine banner and crown.


.
MARCH was a very full month with lots of wonderful swaps and estate sale finds. These sweet baskets were made for the Creative Wings Spring Has Sprung swap.
For Tabitha

For Lisa
In APRIL  I worked on cards for the Paper Cowgirl Rolodex Art Card swap and found a few good buys at a nearby estate sale, including these sweet appliques, buttons, buckles and brooches..
MAY  was all about finishing up Rolodex cards and creating swap items for the upcoming Birdsong event in June. Here are just a few of the Rolodex cards I made.
JUNE brought the highly anticipated Birdsong 3 event at Karla Nathan's wonderful home and studio in Kansas. It was such a fun and friendly event where I saw several creative buddies and met quite a few new ones. Just click on the June link to see all the swaps.
Photo from Karla Nathan
JULY included junqueing

and a pic of the DH's old car that garnered lots of interest.

Click on the July link to see lots of pics of Birdsong 3, including classes and more swaps.

AUGUST  and SEPTEMBER were single-post months due to problems with Blogger, but I did manage to post about all the fabulous Rolodex cards I received from the Paper Cowgirl Rolodex Art Card Swap. Here are a few. If you'd like to see more, just click on the August link.
Debbie Schuh was in Oklahoma City in September and I was able to take two great classes, but no photos unfortunately. You can find links to other blog posts about the event here.

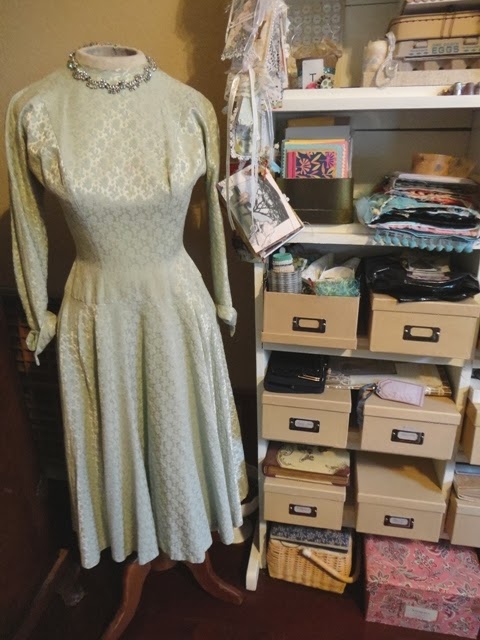
OCTOBER included classes as well as exhibiting at a local weekend antiques show. The show wasn't a great success, but I did enjoy spending time with friends. I also finally found a mannequin that wasn't too large for my space or too rich for my budget. She's plain, but in this lovely pale aqua brocade and her bling, she's perfect! The dress is for sale in my Etsy shop, but I've already found a potential replacement should Ms. Mannequin (still thinking about a name for her) have to give it up. 
Another October event/class that I never showed photos of was the Halloween Soiree at Paper Crown. Here's the room prior to class. I didn't capture all the cuteness, but it was such fun. There was a lovely treat table at the front of the room as well.

Bobbie led us in making these wonderful - and large - Pumpkin King creations! Love him!


She also included sweet little kits to make a bingo card door hanger.

Some of us made headgear for the occasion. My crown turned out well, I thought.

It was such an enjoyable day!

NOVEMBER  included a couple of classes and another Paper Cowgirl swap - a altered tin this time. Here's the one I made. You can see more pics by clicking on November, and see the amazing tin I received under the December heading.
One of my favorite classes this year was Jackie Peters' Christmas Santos class. Mine will be on display year round.

DECEMBER seemed to be a month for tags. I made tags for family
and tags for a swap
one for a friend and one for me
and one more for ME!

Whew! Now, ON TO 2014!  Hope you're having a good year so far! 

Tuesday, December 31, 2013

Gifts

Christmas is past but I wanted to share a few pics of some gifts I sent out that I thought others might enjoy seeing.
One dear friend collects these antique photo albums. This one was a bit damaged, but the embossed velvet cover and brass clasp were so lovely that I had to send it to her. I added the vintage lace and millinery band for fun.
There were several photos in the album, including these two.

Most of the other photos were of men, but the backs were printed with ornate and lovely advertisements for the photographers. I do regret that I didn't take pics of any of those!

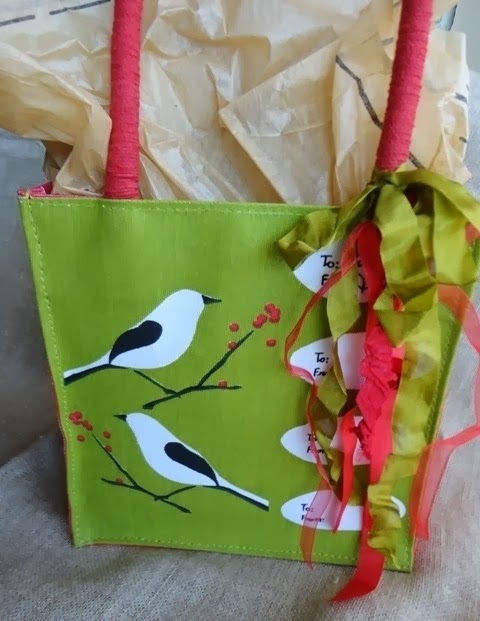
I sent a few things to another friend in this cute little reusable cloth bag. I've saved the bag for several years, waiting for the perfect recipient. 
Several small items were packed into this vintage card box, ideal for holiday gifting.
One of the items sent was this little stocking I made from a vintage quilt and doily.  It was made especially for her as she loves bird-themed creations.
There's been quite a bit of time to create over the last couple of weeks but it's been so cold that I've mostly just snuggled in to read and catch up on DVR'd TV shows and movies.  Hopefully we'll get a few warm sunny days soon to spark my creativity.

I've yet to get photos of my new craft space, but plan to do that as soon as the weather cooperates and I find just the right spot for a few more things!


Friday, December 20, 2013

One More Tag

As I sat at the computer last night, I kept looking at my little jar of Prima chartreuse green flowers on the shelf above. I've had them for several years and have used two or three but there are a lot packed in there. I decided the flowers could become a cute little wreath.  The Christmas colors in our home are turquoise, chartreuse and silver, and I wanted a little something to hang in my craft room. I've been heavily into tags this year - quick and easy to make and store - so I made a large tag.
The background is aqua paper from Basic Grey's 2012 Christmas line. I stamped it with a silver metallic harlequin pattern. For the wreath, I glued alternating glitter, satin and tulle flowers in a circle, then added silver leaves and faux pearls. The Noel was cut last year at a "let's share" craft get together, so I'm not sure what company it's from.  A little wired ribbon and a vintage earring top the tag.


This will probably be the last of my Christmas craft projects. I have a few creative things I need to do around the house before Christmas Eve. We're at the beginning of what is rumored to be a ice storm of historic proportions, so as long as the power stays on, I should have plenty of time!

Monday, December 16, 2013

More Christmas Tags

Inspired by Lorraine at Over The Rainebeau, I used some paper I'd been hoarding to make a couple of tags.
They're mostly just cut and paste, but I did use a bit of Diamond Glaze to highlight a few areas. The lace is from an estate sale. One of the tags is hanging on a dresser knob in my entryway, and the other will be going to a friend later this week.

Happy Christmas creating to everyone!

Saturday, December 14, 2013

White Christmas Tag Swap 2013

Chris at Perfectly Printed hosted a White Christmas Tag Swap this year, and I had the opportunity to join in. I stuck with white and silver, although that wasn't required.

The background paper is Anna Griffin's Winter Wonderland 6x6 pad. I used assorted trims and bling that I had on hand.  The little girl is from a vintage photo purchased at an estate sale.

Here are the wonderful tags I received. I've noted the creator where possible, and linked to any blogs.
1.  Janelle at Sweet Bee Cottage
2.  Laurie at Indulge Your Shelf
3.  Jane at Aralia Jane
1.  Lisa at A Peaceful Place to Be
2.  Shirley at Zetta's Aprons
3.  Pam at Virginia Retro
1.  Jacqueline
2.  Paintin' Patti
3.  DB
And last but most certainly not least, one of the loveliest and most elaborate tags I've seen. I have to show both sides of this one. It was made by Lindy.
I love each and every tag I received. Tag swaps just might be my favorite as you get to see so many interpretations of a theme.

There are other projects underway around here, so I'll be posting more soon.


Saturday, December 7, 2013

Paper Cowgirl Altered Tin Swap - What I Received

My original post about the Paper Cowgirl altered tin swap can be found here.  Today I'll show you the beautiful tin I received from Patty Cross, who was also the swap host. Our theme was time, with no restrictions on interpretation.
Patty used a Boticelli drawing of a young man, then covered the top in embossed clay with gears, watch faces and other interesting baubles.
 The inside has drawings by DaVinci on a fold out booklet over the Mona Lisa and waxed and layered on the opposite side.
 Patty included a packet of buttons, gears and other items for future creative efforts. As an additional bonus, everything arrived in a fun embellished envelope.

Thank you, Patty, for this wonderful creation that I will treasure, and for hosting this fun swap!

Friday, December 6, 2013

Let it Snow!

Woke up to this
and when I went outside with the dogs, I saw this on our patio - 
a perfect puffy snow heart. It was actually a big leaf covered in snow, but it made us happy!

Thursday, December 5, 2013

More Christmas Tags

We traveled to Texas for Thanksgiving and had a wonderful time with family from San Angelo, Odessa and New Braunfels.  My parents and brother and sister-in-law from Oklahoma were also there - 23 of us in all. It was a great weekend!

Before we left I got crafty and made Christmas tags for all the ladies. I made my own tags from cracker and cereal boxes, and made them large - about 7-1/4" x 4".
I used Vintage Christmas paper from My Mind's Eye. The Santa and swirl were already glittered. I fussy cut the Santa, gave him a bit more color with pencils, glittered his beard and hat, added a pompom, and reattached him with pop dots. The swirl was highlighted with a bit of green glitter embossing.
The numbers inside the bottle caps came from a sheet called Countdown from Webster's Pages. The pompom trim on the lower edge is vintage, as is the green and red ribbon.  I added some white and red tinsel and a bit of red seam binding to finish it off.

I have a pile of Christmas papers but couldn't resist buying a few sheets from BasicGrey's 25th & Pine line. I used it to make one more tag.
It was my intent to make several of these so people would have a choice, but I ran out of time.  One of my nieces claimed this one.
  This vintage earring seemed to be just the "decking" this tag needed.

Friday, November 22, 2013

Christmas Tag Class


The week before the Santos classJackie taught a Christmas tag class. She always incorporates several techniques that are new to most of the class. We each made three tags. As always, Jackie had cute kits ready for us, yummy treats and darling name tags. I don't know why I never think to take a pic of the name tags. I have an inspiration board full of them.
For the first Santa tag, we stamped aqua swirls using paint rather than ink, and we embossed the Paris postmark. My funky green background paper was not the best choice for my photo shoot!
For the second Santa tag, we used colored pencils and two types of glitter. I have a bit of faux holly that I plan to place on Santa's hat and some trim I want to use at the bottom - if I can ever find it!  We used paper tape and a clip to attach the little banner.

This one is my favorite. We used glimmer mist on the tag, then stamped it. We added the postcard, then stamped the pear and covered it in gold leaf.  It's really beautiful. Then Jackie had us melt silver and gold crayons and spatter the tag.  Everyone loved this technique!  There's also a tiny "shrinky dink" postmark. The holly leaves are layered and glittered.  So much fun to make!

I have another class tomorrow - this time at My Heart's Fancy - weather permitting. Also, I still need to post about the Halloween soiree at Paper Crown, but I haven't been able to get good pics yet. Soon!

Friday, November 15, 2013

Christmas Santos Class

Thursday evening was spent at the beautifully decorated (as always) Paper Crown, creating in Jackie's Santos class. We had a large group and each and every santos was lovely.
We started with a cigar box, so the piece can hang on the wall or sit on a shelf or stack of books.  The santos figure is made from Character Constructions stamps. Jackie provided beautiful kits and lots of extras to use.  After I got mine home I added three tiny vintage ornaments in silver and aqua - my main colors for Christmas decor. The paper around the sides of the box is aqua, too.

If you'd like to see more, there are class photos and more of the finished santos on the Paper Crown blog here and on Jackie's blog here. A big thank you to both for another wonderful evening and another creation to treasure!